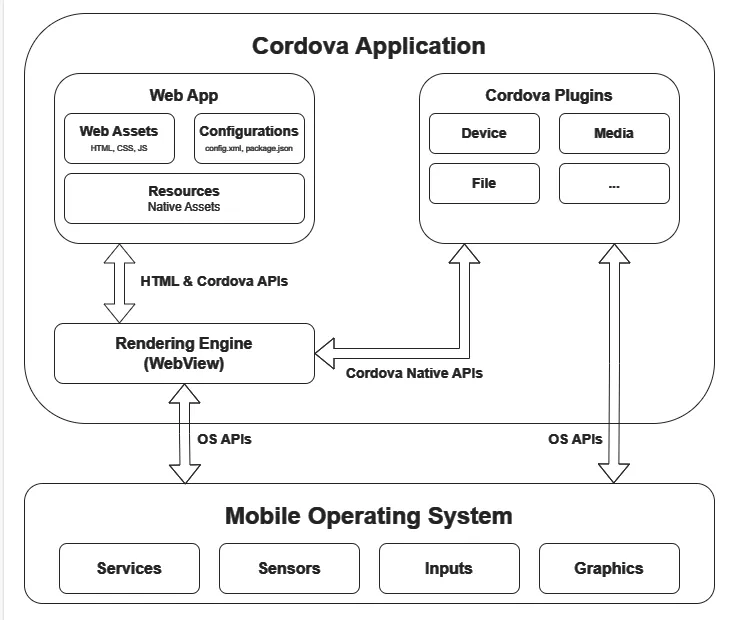
Apache Cordova is an open-source mobile development framework. It allows you to use standard web technologies - HTML5, CSS3, and JavaScript for cross-platform development
项目结构
myapp/
├── config.xml  # cordova 的项目配置文件
├── node_modules/
├── package.json  # js 和 cordova 的依赖配置文件
├── platforms/  # 生成的不同平台的文件
├── plugins/  # 项目用到的插件,暂存在该文件夹,后续会拷贝到`platforms`文件夹
└── www  # 项目工件内容,比如 HTML、JavaScript、CSS、其他资源文件
支持的平台
自定义应用图标
When working in the CLI you can define application icon(s) via the <icon> element (config.xml). If you do not specify an icon, the Apache Cordova logo is used.
<icon src="res/ios/icon.png" platform="ios" width="57" height="57" />自定义启动页面
示例 config.xml
<platform name="android">
    <preference name="AndroidWindowSplashScreenAnimatedIcon" value="res/screen/android/splashscreen.xml" />
</platform>

<!--
  Storyboard (supports all devices):
  Note: images are determined by scale, idiom, and size traits. The following
  are suggested based on current device form factors
-->
<platform name="ios">
    <splash src="res/screen/ios/Default@2x~universal~anyany.png" />
    <splash src="res/screen/ios/Default@2x~universal~comany.png" />
    <splash src="res/screen/ios/Default@2x~universal~comcom.png" />
    <splash src="res/screen/ios/Default@3x~universal~anyany.png" />
    <splash src="res/screen/ios/Default@3x~universal~anycom.png" />
    <splash src="res/screen/ios/Default@3x~universal~comany.png" />
</platform>
Allow List
示例
网络配置 config.xml
Without any
tags, only requests to the location where the app content is served are allowed.
<!-- Allow images, xhrs, etc. to google.com -->
<access origin="http://google.com" />
<access origin="https://google.com" />

<!-- Access to the subdomain maps.google.com -->
<access origin="http://maps.google.com" />

<!-- Access to all the subdomains on google.com -->
<access origin="http://*.google.com" />

<!-- Enable requests to content: URLs -->
<access origin="content:///*" />

<!-- Don't block any requests -->
<access origin="*" />
导航配置 config.xml
By default navigations are only allowed to file:// URLs. To allow others URLs, you must add
tags to your config.xml:
<!-- Allow links to example.com -->
<allow-navigation href="http://example.com/*" />

<!-- Wildcards are allowed for the protocol, as a prefix
     to the host, or as a suffix to the path -->
<allow-navigation href="*://*.example.com/*" />

<!--
    A wildcard can be used to allow the entire network, over HTTP and HTTPS.
    This is *NOT RECOMMENDED*
-->
<allow-navigation href="*" />

<!-- The above is equivalent to these three declarations -->
<allow-navigation href="http://*/*" />
<allow-navigation href="https://*/*" />
<allow-navigation href="data:*" />
Intent 配置 config.xml
This controls which URLs the app is allowed to ask the system to open. Without any
tags, no requests to external URLs are allowed. the default Cordova application includes a quite liberal set of allow-intent entries by default.
<!-- Allow links to web pages to open in a browser -->
<allow-intent href="http://*/*" />
<allow-intent href="https://*/*" />

<!-- Allow links to example.com to open in a browser -->
<allow-intent href="http://example.com/*" />

<!-- Wildcards are allowed for the protocol, as a prefix
     to the host, or as a suffix to the path -->
<allow-intent href="*://*.example.com/*" />

<!-- Allow SMS links to open messaging app -->
<allow-intent href="sms:*" />

<!-- Allow tel: links to open the dialer -->
<allow-intent href="tel:*" />

<!-- Allow geo: links to open maps -->
<allow-intent href="geo:*" />

<!-- Allow all unrecognized URLs to open installed apps
     *NOT RECOMMENDED* -->
<allow-intent href="*" />
Content Security Policy (CSP)
<!-- Good default declaration:
    * https://ssl.gstatic.com is required only on Android and is needed for TalkBack to function properly
    * Disables use of eval() and inline scripts in order to mitigate risk of XSS vulnerabilities. To change this:
        * Enable inline JS: add 'unsafe-inline' to default-src
        * Enable eval(): add 'unsafe-eval' to default-src
-->
<meta http-equiv="Content-Security-Policy" content="default-src 'self' data: https://ssl.gstatic.com; style-src 'self' 'unsafe-inline'; media-src *">

<!-- Allow everything but only from the same origin and foo.com -->
<meta http-equiv="Content-Security-Policy" content="default-src 'self' foo.com">

<!-- This policy allows everything (eg CSS, AJAX, object, frame, media, etc) except that
    * CSS only from the same origin and inline styles,
    * scripts only from the same origin and inline styles, and eval()
-->
<meta http-equiv="Content-Security-Policy" content="default-src *; style-src 'self' 'unsafe-inline'; script-src 'self' 'unsafe-inline' 'unsafe-eval'">

<!-- Allows XHRs only over HTTPS on the same domain. -->
<meta http-equiv="Content-Security-Policy" content="default-src 'self' https:">

<!-- Allow iframe to https://cordova.apache.org/ -->
<meta http-equiv="Content-Security-Policy" content="default-src 'self'; frame-src 'self' https://cordova.apache.org">
Data Storage
Local Storage
var storage = window.localStorage;
var value = storage.getItem(key); // Pass a key name to get its value.
storage.setItem(key, value) // Pass a key name and its value to add or update that key.
storage.removeItem(key) // Pass a key name to remove that key from storage.
Disadvantage
- Only stores strings, so complex data structures have to be serialized, and only data that can be serialized can be store
- Limited total amount of storage (typically around 5MB).
- On iOS systems, WebKit may delete web-related data storage when the device is under storage pressure or exceeds defined storage quotas. This eviction is triggered by WebKit itself, based on its internal quota management policies.
IndexedDB
IndexedDB lets you store arbitrary JavaScript objects indexed with a key
features:
- IndexedDB works asynchronously - you request a particular database operation, then get notified of the result via a DOM event.
- When you make a request, you get a request object, which provides onerror and onsuccess events, as well as properties such as result, error and readyState.
useage example:
var db;
var databaseName = 'myDB';
var databaseVersion = 1;
var openRequest = window.indexedDB.open(databaseName, databaseVersion);
openRequest.onerror = function (event) {
    console.log(openRequest.errorCode);
};
openRequest.onsuccess = function (event) {
    // Database is open and initialized - we're good to proceed.
    db = openRequest.result;
    displayData();
};
openRequest.onupgradeneeded = function (event) {
    // This is either a newly created database, or a new version number
    // has been submitted to the open() call.
    var db = event.target.result;
    db.onerror = function () {
        console.log(db.errorCode);
    };

    // Create an object store and indexes. A key is a data value used to organize
    // and retrieve values in the object store. The keyPath option identifies where
    // the key is stored. If a key path is specified, the store can only contain
    // JavaScript objects, and each object stored must have a property with the
    // same name as the key path (unless the autoIncrement option is true).
    var store = db.createObjectStore('customers', { keyPath: 'customerId' });

    // Define the indexes we want to use. Objects we add to the store don't need
    // to contain these properties, but they will only appear in the specified
    // index of they do.
    //
    // syntax: store.createIndex(indexName, keyPath[, parameters]);
    //
    // All these values could have duplicates, so set unique to false
    store.createIndex('firstName', 'firstName', { unique: false });
    store.createIndex('lastName', 'lastName', { unique: false });
    store.createIndex('street', 'street', { unique: false });
    store.createIndex('city', 'city', { unique: false });
    store.createIndex('zipCode', 'zipCode', { unique: false });
    store.createIndex('country', 'country', { unique: false });

    // Once the store is created, populate it
    store.transaction.oncomplete = function (event) {
        // The transaction method takes an array of the names of object stores
        // and indexes that will be in the scope of the transaction (or a single
        // string to access a single object store). The transaction will be
        // read-only unless the optional 'readwrite' parameter is specified.
        // It returns a transaction object, which provides an objectStore method
        // to access one of the object stores that are in the scope of this
        //transaction.
        var customerStore = db.transaction('customers', 'readwrite').objectStore('customers');
        customers.forEach(function (customer) {
            customerStore.add(customer);
        });
    };
};

function displayData() {
}
Plugin-Based Options
FileSystem API
-
The FileSystem API was a W3C spec that was implemented by Chrome, but not other browsers.
-
While the API is not supported natively by any Cordova platform, the File plugin provides an extensive implementation that is available across all Cordova platforms.
SQLite Plugin
- It is available with support for the Windows platform.
- It effectively has no size limitations.
第三方工具/服务
Ionic Framework Monaca Onsen UI App Builder Framework7 NSB/AppStudio Mobiscroll Quasar VoltBuilder VoltSigner
使用模板
使用模板或者创建模板
配置文件
Config.xml API 配置文件
cordova的全局配置文件,包含:core Cordova API features, plugins, and platform-specific settings.
Plugin.xml API 配置文件
插件配置文件
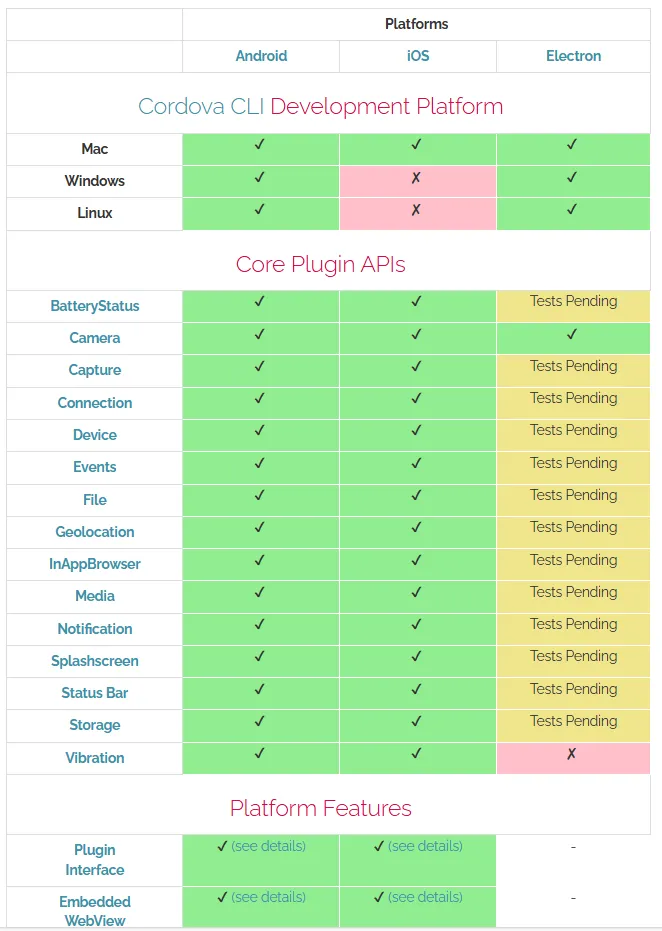
Cordavo JavaScript API
- Battery Status
- Camera
- Device
- Dialogs
- File
- Geolocation
- Inappbrowser
- Media
- Media Capture
- Network Information
- Screen Orientation
- Browser Splashscreen
- Statusbar
- Vibration
quick start
使用Cordova构建Android应用需要完成环境搭建、项目创建、平台配置及构建等步骤,以下是详细流程:
一、环境准备
Cordova依赖Node.js、Java环境和Android SDK,需先完成以下工具安装:
-
安装Node.js
Cordova基于Node.js运行,需先安装Node.js(建议v14+)。- 下载地址:Node.js官网
- 验证安装:终端输入
node -v和npm -v,显示版本号即成功。
-
安装Java Development Kit (JDK)
Android构建依赖JDK,推荐JDK 8(兼容性最佳,高版本可能存在兼容问题)。- 下载地址:Oracle JDK 8(需注册Oracle账号)或 OpenJDK 8
- 配置环境变量:
- 新增
JAVA_HOME,值为JDK安装路径(如C:\Program Files\Java\jdk1.8.0_301)。 - 将
%JAVA_HOME%\bin添加到系统Path中。
- 新增
- 验证:终端输入
javac -version,显示版本即成功。
-
安装Android SDK(推荐通过Android Studio)
Android SDK是构建Android应用的核心工具,通过Android Studio安装更便捷:- 下载Android Studio:Android Studio官网
- 安装时勾选 Android SDK、Android SDK Platform 等组件。
- 配置SDK:
打开Android Studio → 进入File > Settings > Appearance & Behavior > System Settings > Android SDK- 勾选需要的Android版本(如Android 11/API 30,Cordova通常支持主流版本),点击“Apply”安装。
- 记录SDK安装路径(如
C:\Users\用户名\AppData\Local\Android\Sdk)。
- 配置环境变量:
- 新增
ANDROID_HOME,值为SDK安装路径。 - 将
%ANDROID_HOME%\platform-tools和%ANDROID_HOME%\tools添加到系统Path中。
- 新增
- 验证:终端输入
adb version(显示Android Debug Bridge版本)即成功。
二、安装Cordova
通过npm全局安装Cordova:
npm install -g cordova验证安装:终端输入 cordova -v,显示版本号即成功。
三、创建Cordova项目
-
终端进入目标目录,执行以下命令创建项目:
cordova create 项目目录 应用ID 应用名称示例:
cordova create my-android-app com.example.myapp "My Android App"- 项目目录:存放项目文件的文件夹(自动创建)。
- 应用ID:类似
com.company.appname的唯一标识(打包时需与签名匹配)。 - 应用名称:显示在手机上的应用名称。
-
进入项目目录:
cd my-android-app
四、添加Android平台
在项目中添加Android平台支持:
cordova platform add android- 若提示“缺少Android依赖”,检查
JAVA_HOME和ANDROID_HOME配置是否正确,或通过Android Studio安装对应版本的SDK。 - 查看已添加的平台:
cordova platforms ls
五、配置项目(可选)
可通过 config.xml(项目根目录)修改应用基本信息:
- 应用名称:
<name>标签 - 应用描述:
<description>标签 - 图标和启动页:通过
<icon>和<splash>标签指定图片路径(需自行准备不同尺寸的图片)。 - 权限:添加
<uses-permission>标签声明所需权限(如相机、网络:<uses-permission android:name="android.permission.CAMERA" />)。
六、构建调试版APK
生成可在模拟器或真机上调试的APK:
cordova build android- 构建成功后,APK路径为:
项目目录\platforms\android\app\build\outputs\apk\debug\app-debug.apk。
七、运行应用(可选)
- 连接真机:开启手机“开发者模式”和“USB调试”,通过USB连接电脑,终端输入
adb devices确认设备已识别。 - 运行命令:
应用会自动安装到连接的设备或启动模拟器运行。cordova run android
八、构建发布版APK(签名)
发布到应用商店需生成签名的APK,步骤如下:
-
创建签名密钥
使用JDK的keytool生成密钥库(.keystore):keytool -genkey -v -keystore my-release-key.keystore -alias my-key-alias -keyalg RSA -keysize 2048 -validity 10000- 按提示输入密钥库密码、别名密码、个人信息(需牢记密码)。
- 生成的
my-release-key.keystore建议放在项目根目录(或安全路径)。
-
配置签名信息
在项目根目录创建build.json文件,填入签名信息:{ "android": { "release": { "keystore": "my-release-key.keystore", // 密钥库路径 "storePassword": "密钥库密码", "alias": "my-key-alias", // 别名 "password": "别名密码", "keystoreType": "" } } } -
生成发布版APK
执行命令:cordova build android --release成功后,签名APK路径为:
项目目录\platforms\android\app\build\outputs\apk\release\app-release.apk。
常见问题
- 构建失败提示“缺少SDK版本”:通过Android Studio的SDK Manager安装对应版本的Android SDK(如提示“Android-30”则安装API 30)。
- 权限错误:在
config.xml中添加所需权限,或在代码中动态申请(Android 6.0+需动态权限)。 - Node.js版本兼容:若Cordova命令报错,尝试降低Node.js版本(推荐v14-v16)。
通过以上步骤,即可完成Cordova Android应用的构建。如需扩展功能(如相机、定位),可通过 cordova plugin add 插件名 安装对应插件(如 cordova plugin add cordova-plugin-camera)。